Ludmila Ermakova
Exhibitions on the topic " Autumn fantasies"or" Crafts on the topic - autumn"there is for every institution. in this regard, I decided with my children (patronage) conduct MK. The case is fascinating and age-appropriate (14 years) appropriate.
Here we have a miracle.
Abstract master class
"Manufacture autumn topiary»
Compiled and conducted: teacher Ermakova L. A.
September 2016
Topiary- originates from ancient times. At that time, shrubs and trees in gardens, aesthetically pruned in the form of various, bizarre figures, were called topiary. Nowadays topiaries are also popular.
Do topiary with your own hands - fascinating and interesting activity, which can be useful for decorating a room, balcony or home. A large amount of natural material, an uncomplicated technological process and the possibility of a quick end result arouse great interest in this type of creativity.
We will do today topiary - autumn. Any gifts can be used. autumn - leaves, grass, snags, stones and much more
Stylish autumn topiary made of natural material will look great on the windowsill, in the dining room.
A decorative tree can be made of fabric, natural material, seeds, cones, shells, pebbles, etc. d. Topiary can serve as an imitation of a real plant, or acquire completely fabulous shapes and colors. Dimensions topiary range from miniature dwarf compositions to the dimensions of solid indoor trees.
In the manufacture topiary with children we form and develop children's artistic taste, accuracy, attention, diligence and mental activity.
Master the class describes in detail the instructions for making crafts. For this product, it is better to take tree leaves, as they have unexpected colors, as well as spectacular rowan clusters.
For self-fulfillment, you will need such materials:
autumn leaves, dry berries and branches, flowers
wooden stick
Two foam balls
Hot glue gun and sticks
Empty flowerpot or flower pot
Alabaster
Manufacturing technology
1. Foundation.
For your topiary we will make the base - a crown from a newspaper. To do this, you need to crumple the newspaper well, form a crown ball and glue it with high quality (you can use pva glue, or you can wrap it with construction paper tape.
2. Connecting two bases
To do this, insert the rod into the crown hole quite tightly. In order for the newspaper ball to sit tightly on the rod, glue it with a heat gun. After that, the pot is filled with gypsum. It is necessary to hold the rod in the pot while the plaster hardens. The weight of the pot should be greater than the weight of the crown and stem.
3. Decoration.
When all the details topiary connected into one whole, you need to start decorating, then you need your imagination and the material that you you have: tree leaves, flowers or dried flowers, wild apple berries, etc. A decorative container can be decorated with pebbles or a satin ribbon. On top of the alabaster, broken branches can be glued into the container using hot glue.
4. If in creation topiary fresh flowers or twigs with berries were used, be sure to sprinkle with regular strong hold hairspray.
autumn topiary with your own hands - it's exciting and interesting, the work does not take a lot of time, the result of your activity is immediately visible. This creates a great mood both for the creator himself and for those who admire or possess the work.

Related publications:
Synopsis of an integrated lesson for children of the older group on the walk "Autumn Dream" SUMMARY of an integrated lesson for children of the older group on a walk on the theme "Autumn Dream" Program content: - Continue to form.
Synopsis of GCD on physical development for children 4–5 years old “A walk in the autumn forest” ABSTRACT OF DIRECT EDUCATIONAL ACTIVITIES IN THE EDUCATIONAL FIELD "PHYSICAL DEVELOPMENT" FOR CHILDREN 4-5 YEARS OLD "WALK IN AUTUMN.
Synopsis of the teacher's GCD with the children of the preparatory group “A gift for the sun. Topiary - the tree of happiness " Synopsis directly - educational activities teacher with children preparatory group taking into account the integration of educational.
Synopsis of the subgroup speech therapy lesson on literacy "Journey to the autumn forest" in the senior group for children with ONR Tasks: Correctional and educational: 1. Expand and activate the vocabulary on the topic "Trees". 2. Teach children to agree on nouns.
Abstract of the lesson "Autumn Kaleidoscope" on the development of speech and cognitive activity of children of senior preschool age State budgetary educational institution Kindergarten No. 23 of the compensating view of the Nevsky district of St. Petersburg Synopsis.
Cognitive development: Clarify and systematize children's ideas about the signs of autumn. To form an interest in art, observation,.
What do you associate autumn with? With the first trip to school or with the harvest? Or maybe with walks in the autumn forest, with the aroma of chestnuts (roasted or not) and armfuls of leaves? And how would you like, as in childhood, to drag home a handful of chestnuts and a mountain of leaves, losing them on flights of stairs? A very rational thought interferes with desire: “And then what to do with this wealth?”. You can do amazing things!


In this master class, I will show and tell you how to make a do-it-yourself topiary from natural material.
In this work, phased photos will be provided for convenience.
Materials and tools for autumn topiary
- chestnuts, flowers, dried flowers;
- sisal;
- old newspapers, white paper napkins;
- twine, ice cream sticks, wood stick;
- thermal gun, PVA glue;
- plaster, polystyrene, a box of candies.
Progress
Use old newspapers to make a ball, for this you will need to crumple the paper.

Tightly rewind the ball with thread, thereby giving it a shape.

Apply PVA glue to the finished ball and glue white napkins. Let the ball dry.

Make a hole in the ball with scissors and insert a wooden stick into the hole.

We wrap the stick with twine, the end of the twine should be glued so that the twine does not fall off.

Take a candy box, ice cream sticks and brown cardboard. Then glue the sticks.

Dilute gypsum to the density of sour cream. Put the tree in a jar and fill with the mixture. Wait until the plaster hardens. If there is no gypsum, then use alabaster and cement.

Insert the tree into the vase.

Fill the free space with foam and decorate with sisal.

Decorate the tree with flowers and chestnuts, in the master class we do this one by one, glue the flower in the middle and cover it with chestnuts, then flowers and so on, until the very end.


The final chord - plant birds, butterflies, and other decorative animals on the tree.

Admire your tree, it's great!

This concludes our topiary master class. If you want to make more topiary, I advise you to use cones or other Natural resources, as in the photo examples.


Also, such topiaries can be given to your relatives and friends - they will certainly appreciate this little masterpiece, made with love by their own hands.
Video on this topic:
Every year, nature gives us a lot of natural materials suitable for creativity for free. The process of creating with your own hands develops the artistic taste, thinking, memory of the child, cultivates perseverance. But most importantly, you can have fun and usefully spend time with friends, delighting yourself and others with crafts.
Preparation of natural materials for their further use
Nature is the best artist, it creates such natural materials that turn into works of art in skillful hands!

plant materials
chestnuts
Chestnut fruits have a bright brown color and a shiny surface, so they make excellent DIY crafts from natural material. The shell of a fresh chestnut is thin, easily pierced with an awl. Chestnuts are a fertile material for working with young children themselves. You can make many different dolls,.


It is better to store in a cool place in boxes.
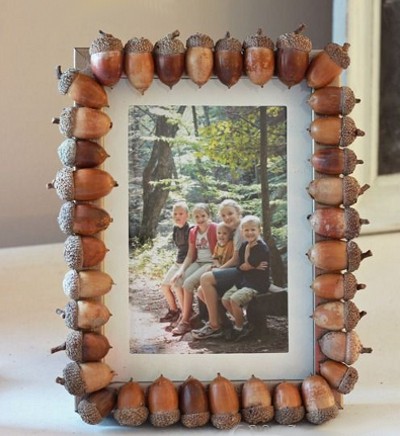
acorns
Oak fruits ripen in autumn, in September-October. collect various shapes and magnitude.


At the same time, their cups (pluses) on which they are held are also collected. Plushs are very often used separately from the acorn, as an independent natural material for various crafts.

Acorn cups and balls knitted from wool
How to knit even balls of wool, see the video Olga Skibina:

Acorn buns and Christmas bells


You can store them for a very long time, after washing and drying thoroughly. But why just keep stones when you can play with them with the whole family?)


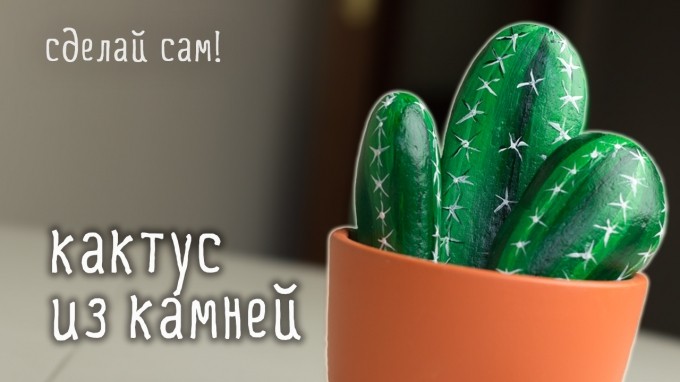
For another way to apply an image to river or sea stones, see the video from You Can Do It Craft. You will be surprised how easy it is!
shells
You can collect shells on the banks of rivers, seas, lakes while relaxing with your children. Many of them are original in appearance, in shape - oval, comb-shaped, elongated, etc.
Boil them for a few minutes to free them from living organisms. Shells are washed with a small brush (you can use a toothbrush), after which they are dried, sorted by type and size. Stored at any temperature.
You can also clean the shells in a solution of whiteness and water at a rate of 1: 1. The top layer will disappear after a while, leaving the shell with a nice shiny top.
Animal figurines are made from large shells.
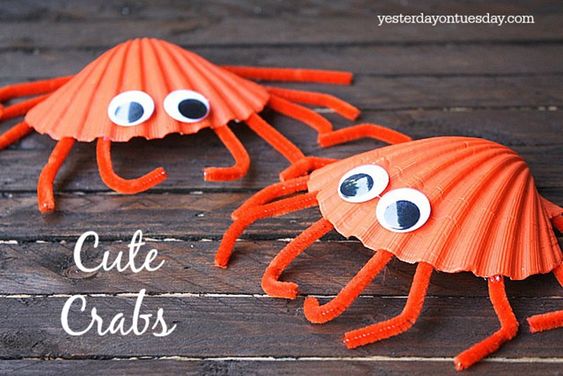


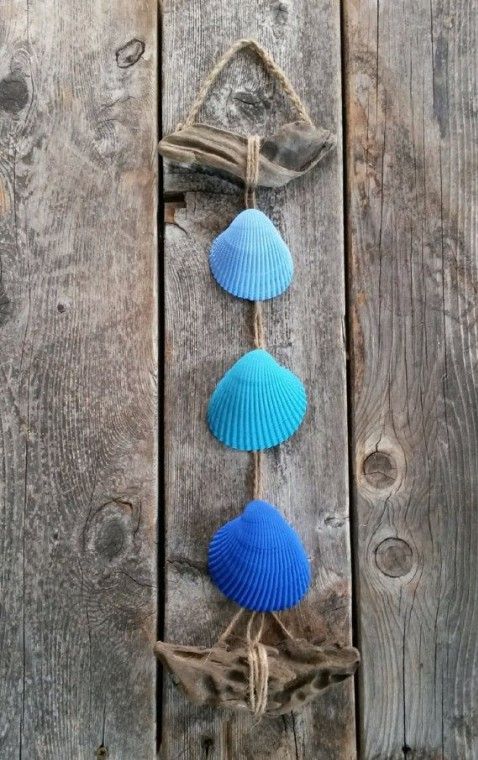
Small shells make wonderful applications, garlands:

Shells can be used not only as the main material, but also as an additional decor (bird wings, dog ears, flower petals, etc.)


Sand
Very affordable material that can be collected in any sandbox. It differs in structure. Rinse and dry thoroughly before use. And then you can use it as a decor in your work:


Rules for the storage of natural materials
Crafts made from natural materials with your own hands will be flawless if, after collecting, drying, pre-treatment, you properly store these natural gifts. To do this, you must adhere to certain rules.
- A dark, cool and well-ventilated area is the best place for storage of natural materials.
- You can buy plastic containers for storing each type of material; use cardboard boxes from shoes, tea, sweets; take ordinary glass jars with a screw cap. For seeds, as well as for beads, it is better to have a container with many compartments.
- Dried flowers are fragile and break easily, so they are placed in a tight box or container. Petals are stored separately from flowers. Flowers with a stem can be stored in a vase.
- Prepared leaves are also brittle. You can store them in large books. Also, for safety, put them in signed candy boxes, grab a little tape so that they do not accidentally open.
- Seashells are placed in glass jars or plastic containers with a wide neck so that they do not crumble.
Additional tools for crafts made from natural materials
To create a beautiful craft from natural materials, you will need additional tools and materials.

It can be:
- colored paper;
- cardboard;
- skin scraps;
- scraps of fabric;
- bird feathers;
- Styrofoam;
- plasticine;
- wire;
- PVA glue, "Moment";
- gouache;
- stain;
- varnish etc.
Paper very often used as an addition to natural materials. Children, bending, gluing it, make the work much more interesting.
plasticine fasten separate parts of simple toys at the initial stage of work. It is not very durable, but as a supplement it is often used in kindergarten and elementary school.

From wire most often they make the frame of a toy, the connection of its parts. Copper wire diameter 0.29-0.35 mm - soft, flexible and durable - the most comfortable. And for the frame, a wire of a larger diameter is used - 1-1.5 mm.
Threads it is better to take thick, multi-colored ones (No. 10).
Glue it is better to take white PVA, BF, etc. However, in kindergarten it is better to use PVA glue.
They also use foil, pebbles, pits from cherries, and bristles.
Additional material is best stored in a small box with cells for each type of material.
Usage additional material depends on the idea, the skill of the children, the degree of development of the imagination! Offer your options, but rely more on children's intuition and desire.

It is also additionally necessary to have certain tools for making crafts from natural material:
- artistic scissors;
- awl;
- jigsaw;
- tweezers;
- pliers and wire cutters;
- sewing needles;
- brushes for glue and paints;
- cotton cloth for wiping off adhesive residue.
Scissors for children should be with blunt ends, small, with rings convenient for a child's hand.
Awl you need to take from a durable material with a handle length of about 6 cm, a diameter of about 2 cm, a stabbing part - 3.5 cm
Needle need a large sewing machine. It must be kept in a needle case with a thread threaded into it.
Attention! Only adults use pliers, pliers, drills!
To draw the contour of the part to be cut out, a simple pencil. For example, dresses, hats for a doll, etc. It is better to take a soft pencil (2M).
Tassels(soft for drawing, harder for glue). It is better to buy squirrel brushes (No. 4 and 6). For glue take brushes with hard bristles.
Stack- a tool necessary for surface treatment of clay or plasticine. The length of the stack for children is about 12 cm.
Crafts from natural material for kindergarten
Toddlers are very fond of turning chestnuts and plasticine into toys in their hands that they can play with. Crafts made from natural material for kindergarten are not very complicated, so any child can do it with the help of an adult. Sometimes they are made from fruits and vegetables, but most often they are applications from leaves and animals from cones and acorns.
Crafts from leaves and maple "helicopters"
The easiest and most accessible work even for kids is the application of leaves. If this is the first time you are making a composition with your child, offer him a picture that will serve as a template. Do not rush to do everything yourself. Invite the child to choose the leaves as desired, so that the work turns out to be similar to the sample. This is how they will develop Creative skills your child.
Application material:
- colorful leaves;
- thick sheet A-4;
- brushes for glue;
- PVA glue;
- scissors;
- sample.
To make a simple composition, you need even, dry leaves. Put them under a press or in a book. In two days the material is ready. Cut out suitable parts with scissors and lay them out on a piece of paper.
Now you can glue. First the background and bottom layers, and then the finer details. For example, if you want to make an elephant, then first make the body and head out of the leaves, and then glue the trunk, tail, legs. If there are not enough eyes, then they can be drawn with a marker or made from tree seeds.

It is not necessary to do everything according to a template. You can come up with a picture yourself and create an original composition of leaves.


Use colored paper, felt-tip pens, paints as an addition, so your applications will be even more interesting.
Along with the leaves, “helicopters” from maple are also ideal as a basis for crafts made from natural material for a kindergarten. Just look at this miracle!

Fairy wings from maple seeds

Dragonflies from maple helicopters
Now you are convinced how beautiful and original leaf applications can be. Use these ideas for leisure activities with children.
Simple master classes on creating children's crafts from acorns and cones
At the end of summer, acorns begin to ripen, and they make wonderful crafts made from natural material for a kindergarten or school. They keep well and last a long time. autumn evenings together with children, you can do a pleasant and useful thing that develops fine motor skills hands of the baby, fantasy and perseverance.
The most common acorn crafts are animals and various little men. From toothpicks, matches, thin twigs, you can easily make legs, handles, horns and other small items. An adult needs to help the children poke holes in the acorns.
To attach small parts, you can use a glue gun, Super Moment glue, but only adults should do this. And it is safest for the guys to fasten the parts with the help of plasticine.

Fly agarics from acorns are even easier to make! To paint acorns, you need to remove the hats from them, and after the paint has dried, glue them in place.


Acorns are very beautiful on their own, and if they are also painted with acrylic paints or nail polish, then such crafts will decorate any home.

And from the hats painted with silver paint, you can make an original decoration for the Christmas tree. The process of creating such an eco-toy is quite simple: we closely glue acorn caps onto a foam ball (you can take an old Christmas ball). And sparkled new.

We found another video for you, where Niki Junior tells what a wonderful craft will turn out from leaves, cones, twigs and a plastic bottle. Look, you will learn a lot.
Categories
To make a topiary from natural material with your own hands, you do not need to have special talents and skills. The richness of shapes and colors of seeds, nuts, cones and dried flowers allows you to create amazing souvenirs literally from nothing. It is enough just to prepare beautiful fruits and flowers, spikelets of cereals, moss, twigs and other materials in summer and autumn.
How to make the easiest topiary
For beginners to master a new hobby, you can offer a simple master class on making souvenirs from natural materials. For work you need to prepare:
- a small ball of foam or plastic;
- twig of arbitrary shape;
- natural material (seeds, flowers, leaves, dry berries, feathers, etc.);
- small capacity;
- plasticine;
- instant glue or glue gun.
When creating a topiary, you may also need scissors, shiny beads, ribbons and lace, paints. All this is easy to find at home, and natural materials will have to be collected in advance and dried, so that after the product is ready, it does not deform and lose its beauty.

Very beautiful trees can be made from pine cones. You need to collect the topiary with your own hands in the following sequence:
- Choose a beautifully curved branch, you can with a fork. Pierce the prepared plastic or foam ball, pour a little glue into the hole and insert the selected stick. When the glue sets, you can continue to work.
- Glue the cones to the ball as tightly as possible. If there is much between them free space and the base material is visible, then you can insert small elements there, trying to completely hide the surface of the ball. For inserts, coniferous twigs are also suitable, as in the photo on the right, and beads (on the left). If desired, you can use maple and ash seeds, euonymus boxes, colorful bird feathers and other material. Set aside the finished tree and proceed to the manufacture of the stand.
- In a small container (a plastic cup, a lid for household chemicals, a pot for seedlings, etc.), put plasticine and knead it, filling the entire diameter of the container. A layer of plasticine should occupy approximately 2/3 of the volume of the container. Decorate the stand from the outside by gluing a "palisade" of sticks, lace and dried flowers onto it. You can wrap the container with felt or leave it unfinished if it's decorative on its own.
- The stick, on which the ball with the composition of cones is fixed, is stuck with the free end into the layer of plasticine. To hide unsightly material, you need to fill the remaining volume of the pot with dried moss, cotton wool or poplar fluff, scales from cones, small seeds, etc. You can add additional decor from spikelets, small cones, pebbles, beads.
Even if this is the first do-it-yourself topiary in the life of an artist, he will not encounter any difficulties in making it.
If instead of a ball we take the base in the form of a cone, then we can make a Christmas tree out of the cones. Such a topiary made of natural material is suitable for decorating a house for the New Year. To make it more convenient to work, it is better to immediately fix the cone on the stem and stand. If you find a thick branch and cut off a short piece from it, then the stem of the souvenir will turn out. For a stand, you can use a wide saw cut of wood or a plank (right).

You need to start pasting the cone with cones from the bottom. This is due to their location: with a downward slope. The Christmas tree on the right is made with the addition of coniferous branches. To assemble it, you need to alternate rows of cones and greenery. To decorate the Christmas tree on the right, plastic leaves and fruits of holly, a shrub symbolizing Christmas and New Year in European countries. Snow on the "branches" and under the tree is made from a mixture of semolina with PVA glue. Such a composition in a semi-liquid state is easy to apply to the cones. After drying, it will firmly adhere to the souvenir.
Eco-style topiary (video)
Leaves and flowers
Very beautiful topiary can be made from autumn leaves. Colorful, elegant, they can rightfully compete with the most sophisticated colors. In addition to the leaves, you can take twigs with the fruits of physalis, snowberry, wild apple trees or ranetok, mountain ash.
The easiest option is fresh or dried leaves and fruits glued to the base. In this case, the artist starts from the shape and color of the material, acting in the same way as when composing bouquets. The main task is to glue all the elements so that the composition looks harmonious. The souvenir is assembled according to the rules described above.

It is possible to supplement the composition of autumn leaves with dried flowers. Many horticultural and wild herbs can be dried at the time of flowering. Yarrow and tansy will not lose their color when dried, and their hard baskets will look just like life. Immortelle and steelwort, prickly muzzle, fennel umbrellas, cilantro, dill, hard helichrysum flowers - all this can serve as an excellent material for creating natural topiary.
Bouquet of lush roses
For those for whom the variety of dried flowers is not enough, we offer a master class on making a composition with roses. For work, you need components for the base of the souvenir, threads, a clothespin and a lot of beautiful maple leaves. Roses will have to be made by hand:
- Take a fresh maple leaf and fold it in half across the main vein.
- Roll up so that the fold line forms a loose spiral. Press the roll with a clothespin so that it does not turn around.
- Fold another sheet in half. Remove the clothespin and, holding the already rolled sheet with your fingers, wrap it with a new folded sheet so that the fold is on top, as shown in the photo. Fasten again with a clothespin and prepare another sheet.
- The next leaflet should be located opposite the one that wraps the core of the future flower.
- A few more layers of folded leaves will make the bud more magnificent. The edges of the "petals" can be slightly bent, imitating real pink flowers. When the flower seems lush enough, wrap it around the bottom with a thread, and tie it securely.
- To get the sepals of a rose, arrange a folded leaf (you can choose a small one) so that the fold is under the flower. Then the protruding ends successfully imitate the sepals. Fasten everything with thread again. Having made several of these flowers, you can begin to assemble the topiary.
You can stick roses in any order, alternating them with dry leaves, chestnuts, cones or needles. If desired, you can decorate roses with "dew drops" from transparent beads or rhinestones. It is best to attach such a decor with transparent glue such as "Moment-Crystal". Droplets can be successfully imitated with both epoxy and superglue.

Topiary from natural material (video)
Other ways to make flowers for topiary
Making topiary from natural materials, you can use the seeds of a bizarre shape in their natural form. So, bergenia stars, euonymus boxes, maple lionfish by themselves will look elegant in any composition. But you can spend a little time and make unusual flowers from natural material that will decorate a souvenir tree.
Laconic topiary, reminiscent of early spring and the very first flowers blooming on bare branches. For its manufacture you need:
- container;
- piece of burlap;
- tree branch;
- pine cones;
- alabaster;
- glue;
- decor (twine, beads).
The plastic container must be pasted over with burlap, cut off the protruding ends. Pour alabaster solution into the container, insert a branch and let it harden.
To assemble the flower, you need to remove the lower thick part of the maple seeds, leaving only the wings. Cut petals from birch bark or corn cob wraps. In each case, the flowers will be different, you can try several options and choose the most suitable one. Lubricate the petal with glue and insert between the scales of the cones. When the entire cone is filled, you will get a beautiful flower.

Maple lionfish and corn wrappers are easy to color with food coloring. To do this, dry material must be placed in a paint solution, kept until stained. Remove and pat dry with paper towels, then spread in a single layer until completely dry.
When the required number of flowers is made, glue them to the branch in random order. If desired, the composition can be supplemented with dried willow buds, leaves and other decor.
Set up a stand. Glue dried moss or beautiful lichens inside the container. Attach coils of twine, beads, "flower" petals to the burlap.
Lush chrysanthemums can be made without the use of cones. To make flowers, you will need maple lionfish or ash seeds. They have an elongated shape and are very similar to the narrow petals of asters and chrysanthemums. You can make flowers for topiary by rolling balls of salt dough and inserting the sharp tips of seeds into them.
For the method of making decor from twigs, you need a pencil sharpener. The process of creating a flower can be combined with sharpening the end of a branch for a topiary. With a sharpener, you need to carefully cut the chips from the knot. Twisting into a spiral, it becomes like a small rose. By choosing branches with brightly colored bark (turf, willow, bird cherry, birch), you can get miniature decorative elements for topiaries in a variety of colors.
In conclusion, it is proposed to watch a video on making an aromatic souvenir using natural fragrant herbs (video 1).
Combining fruits and leaves with dried flowers or self-made decor, you can create topiaries that look like small trees with an elegant crown. Such souvenirs are called "trees of happiness". It is pleasant to receive a gift made with soul at any time of the year. Thanks to a variety of natural ones, one can give a symbolic meaning to one of the holidays.
To make some crafts related to autumn memories with your own hands, it is not necessary to “reinvent the wheel”. You can combine an unusual bouquet and an equally original tree to make an autumn mood topiary. More than one MK (master class) is devoted to the manufacture of such crafts, and this is logical, such a mini-tree is not difficult to make, and the result is always amazing.
To do this, you can use dried flowers, which are easy to find in the fall. But there is a chance that they will slowly disintegrate, forming ugly voids in the tree.
You can offer a more original version - leaves will act as flowers, which will turn into elegant roses. And you will do all this with your own hands.
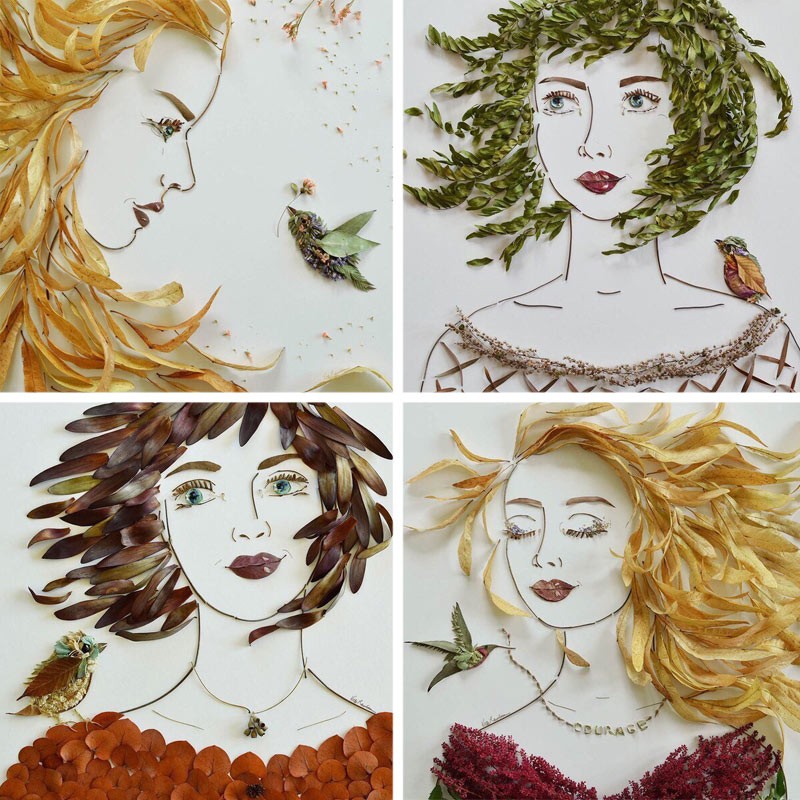
Leaves are the most fertile gifts of the autumn season, there is never a lack of them. BUT Maple leaves with simple processing, they can become a bright decoration for any craft. Look at the photo where the leaves are used, they take the desired shape, and you don’t have to try over the color - all the golden gamut, an abundance of flowers.
What will be required:
- Maple leaves of different shades and about the same size;
- pot;
- Base in the form of a foam ball;
- The basis for the trunk;
- Decorative elements.

The crown will be an unusual bouquet made of natural material. In addition to maple leaves (which act as flowers), there may be rosehip twigs, juniper twigs, small cones, etc.
Master class on preparing maple leaves with your own hands:
- If you just store the leaves in a box they will dry out and start to crack. Therefore, it is necessary to make a special solution that will bring the leaves into the proper form. The solution consists of 200 ml of glycerin and 400 ml of water.
- Take a fairly thick plastic bag, in which you carefully fold the leaves and fill them with this solution. The package can either be sealed hermetically, or (if you can't do it yourself), seal it tightly with adhesive tape.
- The package needs about four days lie down in a dark place, then remove the leaves and spread them on a paper towel.
- After the leaves dry, you will have a ready-made material for creating flowers.
The master class is elementary, but do not violate its steps, otherwise it will affect the result.
Autumn topiary “school tree” (video master class)
Autumn topiary MK: how to make a rose from leaves
The master class continues. Your task is to turn the processed leaf into a rose. How many flowers will be in the crown depends on its initial volume. It is difficult to calculate in advance, so make roses with a margin. The rest can be used for other crafts.
Instructions for making a rose:

- Further bend the very tip of the leaf, twisting the leaf into a kind of roll;

- To form a rose petal, you need to bend the leaf, wrap it around the bud;
- Wrap the third leaf in the same way, the more petals - the more voluminous the rose;

- A little above the petioles, the leaves are fixed with a thread.
There is an MK where it is advised to lubricate the resulting roses with sunflower oil to maintain their shape. It's not required, but it won't be superfluous. If you want, you can color the roses, giving them some accents with your own hands.
The more such flowers, the more voluminous the floristic ball will be - the crown of the tree. In the photo, such a topiary looks incredible.
As the master class showed, from literally improvised (or rather, past) materials, you can make a unique craft.
Maple leaf rose (video)
Autumn topiary step by step
The golden time inspires creativity, and a beautiful tree can be built without using the gifts of nature. If you find it easier to handle material that is not as brittle and does not require special preparation, on help will come master class on making topiary from ribbons. The instructions are simple, the materials are easy to find, examples can be seen in numerous photos. From the photo, determine the colors of the future topiary.

Master class step by step:
- You will need: ribbons of three shades, a thread to match them, and two green ribbons in two shades. The tools are as follows: scissors, a needle, stationery nails, glue, adhesive tape, bamboo sticks, a pot, a base ball, decorative elements.
- First you make buds from bright ribbons. Pick up a tape with a needle and thread. Bend the edges of the tape alternately, sewing them with hand stitches so that the design resembles a bud. The photo shows what shape the rose should take.
- The first rosette is formed in six layers. Cut the end of the ribbon, then twist it tighter and pull it through the hole in the middle of the flower.
- The flower is fixed with a needle and thread at the back, after which the end of the ribbon is cut off. You need enough flowers to make a round bouquet.
- To form a do-it-yourself topiary, stationery nails are required. The carnation is injected into the center of the bud under the first layer of the flower, that is, the carnation will be invisible. The edges are additionally fixed with two carnations so that the flowers do not look disheveled.
- Now green leaves are being made. Cut the tape into pieces, bend the edges and ends of the base, fix them with carnations. Petals are inserted between the buds, filling the voids.
- Make the trunk out of three bamboo sticks that are held together with adhesive tape. Then the trunk must be wrapped with green tape, fixing with glue on the edge of the sticks.
- Additional decor on wood- This is a clothespin-butterfly, for example. A small ladybug can decorate a topiary.

Autumn topiary: crafts in kindergarten
A rather simple but beautiful topiary on the same topic can be made for crafts in kindergarten. The baby himself can do a lot with his own hands, and his parents will help him.
MK for crafts in the kindergarten will be simple:
- Collect maple leaves, rowan berries, interesting twigs and other gifts of the autumn season. Especially for this, take your baby for a walk in the garden, at the same time it will be an introductory tour.
- The base of the topiary will be a thick twig, straight or winding, with knots.
- Arm yourself with a glue gun and a pot for the base. The tree can be placed in an ordinary glass, wrapping it with a themed napkin.
- To build the base of the crown, you can simply form a ball of crumpled newspapers, tie it with threads. Glue bunches of rowan and leaves on this ball. Wrap each bundle at the base with threads, and then glue on the ball.
- Acorns and chestnuts will decorate the bouquet-tree.

Everyone will like this craft in the garden, and most importantly, a child will do it with his own hands. Repeat the master class with him in words so that he can tell when he comes to the garden how he made the tree. Do not forget to capture such a bouquet in the photo.
With his own hands, a child can not only collect materials for a tree, but also repeat the master class in actions that are feasible for him.
In addition, you can include dried flowers in the bouquet and what else the garden is decorated with in the fall. In the photo gallery, find interesting ideas for do-it-yourself topiary.
Topiary "Gifts of Autumn": master class (video)
Many tutorials explain how to create a beautiful, original topiary. Supplement MK with improvisation, your own decor options, focus not only on pictures on the Internet, but also on your own impressions of this time of year.
Autumn topiary (photo ideas)