I came across a very understandable and detailed master class on how to make a house of their matches. I have been interested in this question for a very long time)), and then all the secrets were revealed.
A house of matches will require almost nothing, "except for sleight of hand", a little diligence and a few hours of free time. You will need: 6-7 boxes of matches, a button or a coin (3 Soviet-era kopecks or 2 Russian rubles or 50 Kazakh tenge or any other money with a diameter of about 24 millimeters), a book or a floppy disk or a CD box (assembly stand).
1. Place 2 matches on the book parallel to each other at a distance slightly less than the length of the match. sizes.


2. Lay 8 matches on top perpendicular to the first two. Moreover, the extreme matches should form a square with 2 matches of the 1st row, and between all the other matches there should be approximately the same small distance.

3. The next row is 8 more matches. Lay them perpendicular to the previous 8, also with a small distance between them.

4. Carefully make a "well" of 7 rows, placing the match heads in a circle.


5. From above, make a flooring of 8 matches. Lay them with their heads in the direction opposite to the heads of the matches of the lower flooring.

6. Perpendicular to the previous row, put the next - from 6 matches (add 2 more extreme ones later). From above, press the resulting design with a coin.


7. Holding the coin with your finger, stick the matches vertically in the corners of the house with the head up. Matches must pass between the upper and lower floors, and their edges must come out from below. The matches of the lower flooring can be moved apart with another match or a toothpick, just make sure that the house does not move out of the lower matches.


8. It turned out a house on legs. Stick the matches along the perimeter along the walls, pushing the flooring with an auxiliary match or toothpick and pressing the structure with your finger.


9. Squeeze the walls of the house from 4 sides, moving them to the matches stuck vertically. Take out the coin with a match.


10. Take the house in your hands and crimp on all sides.


11. Press the matches that went around the perimeter so that they press the floor with their heads. The resulting square of match heads is the foundation of the house. Those. what was up became down. Putting a house on it, get a frame with the ends of the matches sticking out in different directions. They are needed to build the walls and roof of the house.


12. Finish the walls first. To do this, insert matches vertically with their heads up from all 4 sides.


13. Next lay another one at a time - now a horizontal layer of walls. In this case, the matches should go in a circle, as in the construction of a well, and the heads should alternate with the ends of the matches. After inserting all the horizontal matches, press their heads so that they press the matches of the adjacent walls.


14. Now proceed to the roof. First, insert the missing matches into the corner holes and, poking the vertical matches of the walls from below, pull them up.


15. Lay the roof matches perpendicular to the top deck, starting from the edges and alternating the directions of the matches.
16. First stack 2, then 4, 6 each and in 2 central 8 each.
17. Between the vertically sticking matches, carefully insert the matches - “tiles” with their heads towards the middle. After that, press them in a circle with the heads of the side matches, pressing on them with your fingers.


18. In conclusion, you can decorate the house with a “pipe” of 4 matches inserted into the roof, a “door” and “windows” of matches broken in half and inserted into the walls.


By this principle, you can build churches and castles of any size.
From the Internet
AT modern world handmade items are highly valued. It is always a pleasure to receive such gifts: the soul of the donor is invested in them, as well as his free time, but for some this is the time - a great luxury. It is doubly pleasant to think that someone spent their strength and efforts on you. This article will teach you how to make a house of matches on your own.
Crafts for the development of perseverance and mindfulness
When raising and developing a child, time must be devoted to the development of his perseverance and attentiveness. Without these qualities, the baby will have much more difficulty in kindergarten and school, and it will also be difficult to cope with work already at an older age, and indeed in life. An excellent practice is to create crafts from a cheap and affordable material, the environmental friendliness of which is beyond doubt. And the process itself will not only give you and your child a unique job as a result, but also help the baby become more patient and quick-witted, accurate in movements and attentive to details, teach you how to achieve your goals, develop taste and creative activity. Therefore, do not hesitate - consider this review in more detail and proceed directly to the product design process.
Great craft material!
In order to answer the question of how to make a house of matches, great talent is not required, and experience and skill will definitely come to you in the process. It should be noted that such a pastime is pleasant and interesting not only for children, but also for adults. The activity is calming, it is like a kind of meditation. You can make crafts of any size from matches, from a small well to a large castle. With such crafts, you can beautifully and stylishly decorate the interior, painting them with bright colors or leaving them in their original form. The resulting stylish and original crafts can be presented to relatives and friends. When modeling a house, it is better to use either PVA), but you can do without it. However, keep in mind that without the use of glue, making a house out of matches will be an order of magnitude more difficult. Matches can be used as a whole, or you can break it into pieces.

Adult advice
Making a house out of matches? If yes, then you should pay attention to one important tip: do not leave very young children alone with matches because of their flammability (remember the well-known phrase “Matches are not a toy for children”?) understand better.
Materials and tools needed to create crafts from matches
How to build a house from matches? We will need:
- seven or eight boxes of matches (depending on the size of the planned craft);
- coin or button;
- a stand made of a thick sheet of cardboard, a book or a CD, on which our structure will be placed.
Let's start building a house
Let's try to figure out how to make a house of matches. First of all, we form the foundation of our future house. We lay out two matches in parallel at a distance, and on top - eight matches in one row, so that they are perpendicular to the two lower ones. We put the matches at the same distance from each other and make sure that the extreme ones form a regular quadrangle with our “stand”. We lay out the next row - again perpendicular to the bottom layer, in the amount of eight pieces.
How to make a house of matches beautiful and neat? We make a structure of seven or eight rows, and in order for the house to have aesthetic appeal, we make sure that the match heads are located in a circle.

Here you can stop at the "well" or modify it a bit and get a small house of matches - with your own hands, as you will see further, it is not difficult to make it. To do this, we make another layer, using eight matches, we put six more perpendicularly on top. Next, put a coin or button on them. We take the "well" and set one match for each corner. They penetrate the top layer and must exit into the base. Make sure that the "well" does not move out. After the house is strengthened at four corners, we stick new parts along the perimeter of all walls. For even greater reliability, we squeeze the house with our hand, moving the matches to the button (or coin), and then remove it.
Squeeze the details that were inserted with the button into the house, and carefully press the product itself on each side. Now the foundation of our "well" will be the basis for the roof. Let's get to the walls. To do this, add two match rows to each wall of the house. One row should be vertical (we insert the matches upside down), and the second - horizontal (we lay the material in a “well”, match heads alternate with tips). After completing the work, you need to squeeze the house again, press in the heads of the parts that protrude, so that the matches are well pressed and held together.
We build a roof for future crafts
For the roof, the details are pulled out of the finished building - first we pull out the match from the corner, and then we poke the vertical matches of the wall from below and pull it up.
When we have drawn out all the building elements, we fill the roof of the building. We lay the matches perpendicular to the top layer from the very edge of our house. The roof pattern should resemble a checkerboard pattern.
Finally, the final stage is the construction of the slope of the roof of the house. We will make it from matches, placing them to the center with their heads all over the roof. We lay two rows - and press the match heads on the sides, securing the roof. Now our house with a roof is ready!

For beauty, you can still complete the house, decorate it with windows, a door or, for example, a pipe. A pipe can be created from half a match by inserting it into the roof of a house with its head up. This is a small house of matches without glue, learning how to make it, you can move on to much more monumental structures.
Additional buildings to the house
A fence for a house can be built from match wheels. Wheels can be made in various sizes and can also be used to decorate the house itself, to create wells, and so on. There are several options for manufacturing these parts, so you should consider this process in more detail.
Making wheels out of matches
To create wheels from matches, you do not need to use glue, since the matches will be held even without it thanks to We lay one match as a base through two, three, four support matches (this is the first option for building a wheel). The wheel will have fifteen vertices, and one hundred and five matches are needed to build it.
The second option - we put two support matches each, then the wheel will consist of ninety-five parts with nineteen peaks and a small diameter. Such wheels will allow us to place them in larger products.

The third option is to create wheels by placing them through three support matches. There will be twenty-one vertices, and eighty-four details are needed. These wheels will be smaller than the previous ones.
To create a wheel with the smallest diameter, we must put matches through four support ones, such a wheel will have twenty-two vertices and consist of sixty-six parts.
If you decide to create your own house of matches, then you should familiarize yourself with several useful tips. They make the whole process much easier.

Great pastime for kids and adults!
We hope you enjoyed our tutorial. A house of matches, if you follow the steps described in the article, it will turn out beautiful and original. And the time spent on creating a house of matches will bring a lot of pleasure.
What can be said in conclusion?

This article discussed the steps by which you can build a house of matches. For beginners, this can be a starting point, and in the future, using your experience and imagination, you can create more serious objects. For example, palaces, mugs, towers, horses and even portraits are made from matches. Therefore, start small: gather the whole family, read the article on how to build a house of matches and start the construction process. And maybe very soon, on one of the sites we will stumble upon photos of your beautiful and original crafts.
Good luck in your efforts and success in creating a house! If you make every effort and use all your imagination, then you will not have any problems with the design of products from a material such as matches.
You still don’t know how to make a house out of matches, create pictures from these wooden elements? Check out the master classes illustrated with 57 photos!
How to make a house out of matches?

To create it, you need only 3 items:
- matches;
- plasticine;
- coin.
- Lay 2 matches in parallel. Fix them on the work surface with plasticine.
- From above, perpendicular to the data, put 8 matches so that the heads and tails peek out from both sides of the first two matches. Lay these "beams" at home at the same distance.
- The first tier is ready. The second also consists of eight matches, we lay them perpendicular to the first layer.
- From above, along the perimeter, put 4 matches.
- In total, you need to complete 6 such fragments, consisting of 2 rows of 8 and one of four matches.
- Complete the frame of the structure with 8 matches laid parallel to each other and 6 that you will place perpendicular to them. Here's how to help make a match house further.
- To make the frame strong, take its fragments from above with a coin, and from below with your hand. Holding the workpiece in this way, stick 4 matches in the corners of the house, and then around the entire perimeter.
- Put a coin inside the “logs”, press it so that the elements of the structure are tightly pressed against each other, and the heads of the vertical matches are well marked. Insert 6 matches between them, and the same number - perpendicular to the data.
- Here's how to make the matchstick house next to form the roof. Stick 4 matches in the corners of the frame, and then 7 more matches in the upper part of each wall.
- In the resulting roof box, we lay matches horizontally so that in each subsequent row there are fewer of them than in the previous one, and a triangular roof begins to form.
- There will be 6 matches left on one and so many on the other side of the gable roof, while their heads will cross with each other, and the reverse sides of the matches will be held on vertically placed “bars”.

Here's how to make a house out of matches without glue.

Such a structure will be an original gift, and it is made of cheap material. If you like this idea, do not stop there, see what else can be made from matches. Such wooden objects look great, you can organize a home exhibition by placing them on a table or on shelves.

What can be made from matches?
Having learned the answer to this question, you can make not only a house, but also a lot of interesting things. Do you want to have a whole composition made of wood? Then see how to make a well and a fence from the same material.

For this you will need:
- matches;
- stationery knife;
- glue for wood;
- thin brush;
- toothpick;
- board;
- thin thread.
- First, prepare your matches. Put one on the board, cut off the heads with sulfur. They can not be thrown away, but used for firecrackers.
- Put 4 matches, forming a square out of them with ends extending beyond it. To do this, put the first, place the second perpendicular to the given one, but so that at the point of their contact the end of the first comes out 5 mm.
- The edge of the second will come out in the same way and in the same way when you connect it with the third match. In this technique, fold all 4 parts, gluing the place where they meet.
- In total, you will get 9 rows of "bars" for the house for the well. In each subsequent match, the edges of the matches should come out so that they form an angle of 90 ° with these elements of the previous one.
- To make the pillars that support the roof of the well, place 2 matches in parallel at a distance of 3 mm. Cut the third into 2 pieces, glue one to the top and the other to the bottom to connect 2 paired elements. Make another such column.
- Pass a toothpick into the hole formed on one and the other side, after winding the thread around it. Glue to the posts. On one side, bend the toothpick to make a handle for rotation.
- We make a roof. Lay 2 matches in parallel, stick on them perpendicularly, laying close to each other, 13 matches. Also create the second half of the gable roof. Connect them by threading the top of two matches into the first slope, and the top of the other two into the second. From below, glue a match horizontally on both sides so that the roof looks triangular from the side.
- Next to the well, place a fence made of two parallel matches, to which several more elements in the form of a picket fence are glued perpendicularly.

If you want, mold a bucket out of plasticine or make it out of a thimble and attach it to the underside of the rope.
You can make a cart out of matches and add it to the landscape of village life.

For work you will need:
- matches;
- knife;
- glue;
- rag.

Now let's make an axle for the wheel. The first will be the longest, this is necessary to connect the structure. Put the second axis so that it is perpendicular to this one.

Lay four small fragments that will become the radii of this circle. Do the same for the second wheel.

Glue them with one match. In the same technique, perform the second pair of wheels.

Now you need to connect these two blanks with three crossbars.

We proceed to the manufacture of the following fragments, which will tell you how to make matches an excellent building material for home creativity. For each of them, take two matches, place a small fragment of this material in the center, connecting the elements with glue. The second part is identical to this one.

Now put these two blanks in parallel, connect them with three matches, as in the photo. We glue two matches to the resulting part, placing them slightly obliquely.

There is very little left, and soon you will find out that you can make such an interesting cart out of matches that will become an almost exact copy of the real one. We glue two diagonal pieces of wood together with the help of the third. We perform the same manipulation on the other side of the part.

Glue one match on each side of the cart and flip it over to the other side to fill each side with three small wooden sticks.

You can put the top of the cart on the wheel part and put a new exhibit of homemade wooden art next to others.

After you have done a lot of useful things, you will be left with empty boxes, but they can also be used.
The child will be just happy if you make such a little train with him, in which you can put small toys.

Here are the items that were taken for this creation:
- matchboxes;
- glue for cardboard;
- toothpicks - 9 pcs.;
- wine corks - 2 pcs.;
- several matches;
- threads;
- scotch;
- cotton wool;
- thick needle.

In the same way, make other wagons. Connect them with a thread and a needle.
In order for the cars to withstand the weight of the toys planted in them, take a strong thread, it is better to use yarn for this.

Now you can make a locomotive. To make it, glue an inverted box to an already finished wagon, connect them together with another one that needs to be placed on a small side.
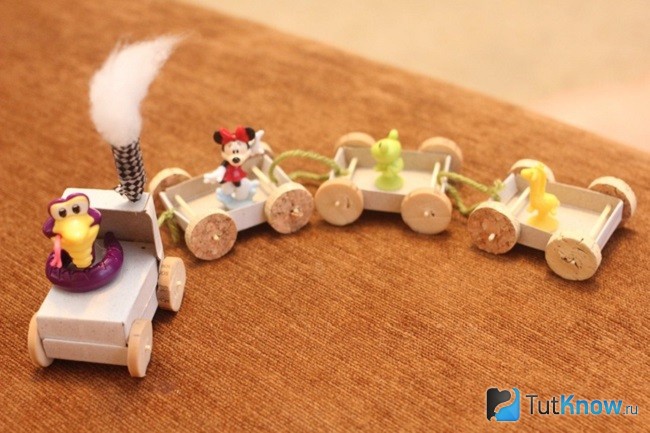
To make a pipe that emits safe smoke, place several matches next to each other and place a toothpick in the center. Put cotton wool on top of the pipe, rewind it all with tape to secure it. Attach this finishing touch to the locomotive by sticking a toothpick into its cardboard surface.
The kids will be interested not only in this idea. If you tell them what can be made from matches, they will gladly make a funny picture. Depending on the age of the child, it can be simple or more complex.
How to make a portrait, a picture of matches?
If the child is small, before giving him matches for creativity, cut off the sulfur from them. After all, the baby can try it by mouth, and the substance is very harmful.
After the wooden sticks are ready, you can proceed. So, for such a picture you will need:
- matches without sulfur;
- a sheet of cardboard;
- pencil;
- glue;
- paints with a brush.
After the donkey is created, have the child paint over the background of the picture. You can glue a few small branches, and the masterpiece is ready.

See how to make a house out of matches so that it is flat.
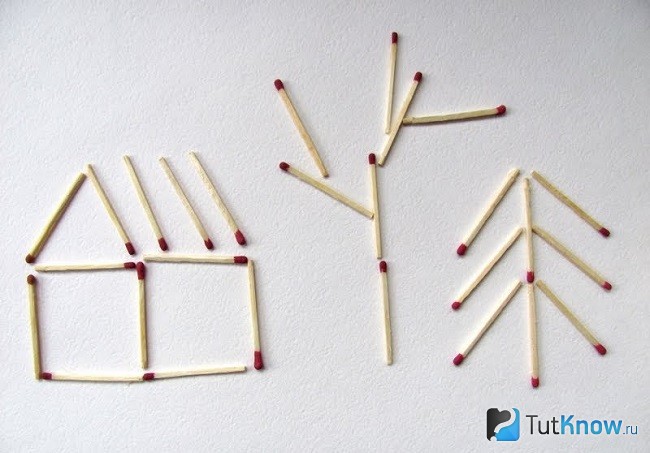
The walls are square, the roof is rectangular. For trees, first a trunk is made, then branches are laid out from matches.
For older children and adults, a very interesting idea is offered. After reviewing it, you will learn how to make a portrait of matches.

They will need a lot and preliminary preparation is necessary, since sulfur must be removed. To do this, the matches are placed in a basin of water and the coating that is unnecessary for further work is washed off. Then they need to be dried.

With an awl or other sharp object, make 4 holes in the box, it is important that they are at the optimal distance. If it is small, then all the matches may not fit, and if it is too large, then the formed cube will become too loose and crumble.

Next, you need to make a kind of well, the walls of which consist of seven rows of matches.

We fill inner part blanks, placing matches around the entire perimeter here. We align them with a coin, after which we remove this cube from the box and very carefully so that it does not crumble, we compress it from all six sides.

We put this square blank on its side and fill the upper side with a horizontal row. We also make out the other three sides.

In the process of this work, do not forget to carefully compress the cube so that the wooden components fit snugly together.
Now about how many matches you need. About 150 pieces will go to one cube. In total, you need to make 30 of these figures. Place them next to each other so that the heads of unwashed matches with sulfur are at the edges. Then they will form a beautiful frame.

Connecting the squares is very easy. Stick 4 matches along the edges of the first and second, press a little so that these two figures begin to fit snugly against each other. Thus create the first row.

Then, also, connecting the elements with four matches, build a canvas for the picture.

To make a portrait of matches next, print the image. It can be a favorite hero, friend, as well as a self-portrait. Print in black and white using checkered paper. If this is not possible, then simply line the photo by drawing rows with a ruler and pencil. The lines that bound the 10x10 square should be more distinct.
This is how the portrait should look on the grid. For example, let's create the appearance of Paul Walker from matches.

Looking at the linking, put the matches with sulfur heads forward where there are dark fragments in the photo. So you select them and you can make a portrait.

It remains to mask the joints of the cubes so that these places look more neat, and you can put your work in the most prominent place and be rightfully proud of it!

If you have any questions, watch the three videos. From the first plot, you will learn how to make cubes for the base.
The second shows how to combine these fragments into a whole canvas.
The third plot will teach you how to transfer your favorite image to a stencil and lay it out of matches.